

Table of Contents
1. How to design an Uncoated ELISA workflow for a new biomarker?
2. How to choose antibodies and starting conditions for Uncoated ELISA development?
3. How to optimize blocking, washing, and incubation conditions for reliable ELISA signals?
4. How to optimize standard curves and evaluate Uncoated ELISA reproducibility?
5. How to optimize sample dilution and evaluate matrix compatibility in Uncoated ELISA?
6. How to troubleshoot high background, weak signals, and poor standard curves in Uncoated ELISA?
7. Which Uncoated ELISA products and tools support assay development?
8. Related resources
Introduction
Uncoated ELISA kits stand out in life science research for their unparalleled flexibility, allowing researchers to customize coating antibodies, adjust reaction systems, and adapt to diverse biomarker detection scenarios that pre-coated ELISA kits cannot cover. However, high flexibility also means multiple variable factors. Unlike fixed pre-coated assay protocols, uncoated ELISA assays rely entirely on manual condition exploration and parameter tuning, which frequently leads to common experimental problems such as high background signal, low detection sensitivity, unstable OD values, and poor intra-assay and inter-assay repeatability.
For many researchers, the biggest challenge is not operating the ELISA workflow, but screening and stabilizing the optimal assay conditions for specific biomarkers and samples. This step-by-step optimization guide focuses on core parameter tuning and system optimization, helping laboratories eliminate trial-and-error costs, build stable uncoated ELISA assay systems, and obtain reproducible and credible experimental data.
01 How to design an Uncoated ELISA workflow for a new biomarker?
Developing an uncoated ELISA workflow for a new or rare biomarker requires a scientific, stepwise design instead of blind trial and error. Before you test antibodies or buffers, define what the assay must achieve.
Key questions include:
● What is the target analyte?
● What sample types will be tested: serum, plasma, cell culture supernatant, tissue lysate, urine, or other matrices?
● What sensitivity is required?
● What dynamic range is expected?
● What dilution factors are acceptable?
Standard Operating Procedure (SOP) for Uncoated ELISA kits:
The following SOP is based on Elabscience® Sandwich-ELISA protocols and can be used as a starting point.
Table 1. Uncoated ELISA protocol
|
Step |
Procedure |
|
①Coating |
Take out the ELISA Plate, add 100μL Capture antibody working solution(Dilute in coating buffer) to each well. Incubate overnight at 2-8°C. |
|
②Blocking |
Discard the liquid, add 200μL ELISA Plate Blocking Buffer to each well. Incubate for 60 min at 37°C. |
|
③Add standard or sample |
Discard the liquid, add 100μL standard or sample to the wells. Incubate for 90 min at 37°C. |
|
④Detection antibody |
Discard the liquid, immediately add 100μL Biotinylated Detection antibody working solution to each well. Incubate for 60 min at 37°C. Aspirate and wash the plate for 3 times. |
|
⑤Enzyme conjugate |
Add 100μL HRP conjugate working solution. Incubate for 30 min at 37°C. Aspirate and wash the plate for 5 times. |
|
⑥Color development |
Add 90μL Substrate Reagent. Incubate for 15 min at 37°C. |
|
⑦Stop |
Add 50μL Stop Solution. |
|
⑧Read |
Read the plate at 450nm immediately. Calculation of the results. |
02 How to choose antibodies and starting conditions for Uncoated ELISA development?
High-quality ELISA antibody pairs are the cornerstone of successful uncoated ELISA development, and Elabscience® Uncoated ELISA kits provide highly matched capture and detection antibodies as a reliable foundation for optimization. Checkerboard titration is the classic and most efficient method to optimize the working concentrations/dilution ratios of capture antibody, detection antibody, and HRP conjugate, avoiding weak signal or high background caused by unsuitable antibody concentrations.
2.1 Optimize Dilution Ratios with Checkerboard Titration
Checkerboard titration is the gold‑standard method to screen optimal working dilutions for capture antibody, detection antibody, and enzyme conjugate simultaneously in one 96‑well plate setup. Instead of testing one variable at a time, cross‑gradient combinations evaluate signal‑to‑noise performance efficiently and save antibody consumption.
Checkerboard Titration Operation Scheme:
Set gradient dilution ratios for core reagents to conduct cross-matching tests, with specific dilution gradients as follows:
● Capture antibody dilution gradient: 1:250 / 1:500 / 1:1000
● Detection antibody dilution gradient: 1:250 / 1:500 / 1:1000 / 1:2000
● HRP enzyme conjugate dilution gradient: 1:250 / 1:500 / 1:1000
● Set standard wells (ST wells, fixed target concentration) and blank wells (BLK wells) for all reagent combination groups to eliminate environmental and reagent background interference.
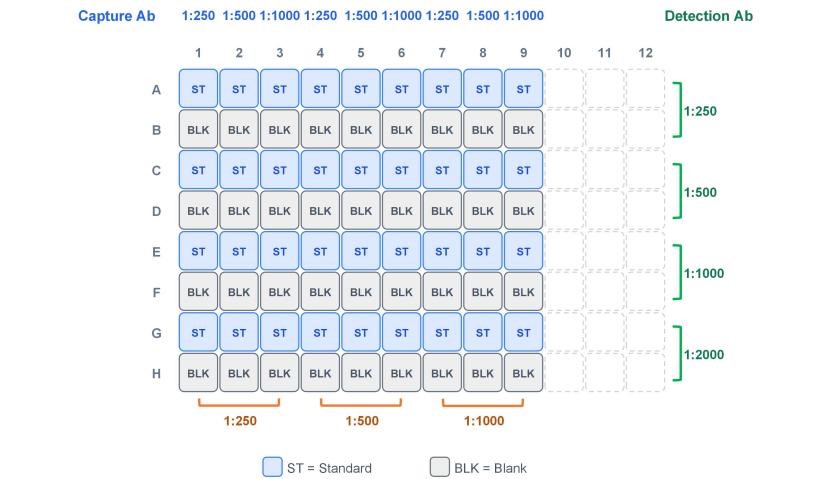
Fig. 1 96-Well Plate Layout for ELISA Checkerboard Titration.
2.2 Standard Screening Acceptance Criteria
Screen the optimal antibody and enzyme conjugate dilution ratio based on the following unified criteria to ensure assay sensitivity and specificity:
● Standard well OD value (ST-well OD) ≥ 0.8 (ensure effective target signal)
● Blank well OD value (BLK-well OD) ≤ 0.2 (control low background noise)
● Signal-to-noise ratio (S/N=ST/BLK) ≥ 10 (ensure reliable assay specificity)
When multiple reagent combinations meet the above criteria, priority is given to the combination with balanced dilution factors of the three reagents, which can maximize antibody utilization and reduce experimental costs while ensuring assay stability.
03 How to optimize blocking, washing, and incubation conditions for reliable ELISA signals?
After confirming core reagent ratios, the optimization of auxiliary experimental conditions (blocking, washing, incubation) directly determines the stability of uncoated ELISA signals. Most poor assay results are caused by insufficient blocking, incomplete washing, or unreasonable incubation temperature and time.
3.1 Blocking Condition Optimization
Insufficient blocking leads to non-specific binding and high background. It is recommended to use professional blocking buffer, with a fixed incubation condition of 37°C for 60 min. Avoid shortened blocking time or low-concentration blocking solution, which cannot completely block residual active sites on the ELISA plate.
3.2 Washing Condition Optimization
Incomplete washing will retain unbound antibodies and enzyme conjugates, increasing background noise. Formulate differentiated washing times for different steps: 3 times washing after detection antibody incubation, 5 times washing after HRP conjugate incubation. Ensure each washing step fully infiltrates the well bottom and wall, and pat dry residual liquid after washing.
3.3 Incubation Condition Optimization
Strictly follow 37°C constant-temperature incubation for all antigen-antibody binding and enzymatic reaction steps. Low temperature will slow down the binding reaction and cause weak signal, while excessive temperature will lead to protein denaturation and affect assay activity. Do not arbitrarily adjust incubation time to avoid inconsistent reaction degrees between wells.
04 How to optimize standard curves and evaluate Uncoated ELISA reproducibility?
A high-quality ELISA standard curve is the foundation of accurate quantitative detection: it must be monotonic, span the expected sample concentration range, and be generated from accurately prepared standards, with sandwich ELISA typically fitted using a 4PL model. Reproducibility evaluation is also key to verifying the stability of the uncoated ELISA assay.
4.1 Standard Curve Optimization
Prepare standards using a 2-fold or 3-fold dilution series with at least 8 concentration points and as uniform intervals as possible, and set triplicate wells for each concentration to reduce random error. Avoid excessive concentration gradients or uneven dilution, which can distort the curve. After testing, fit the standard curve with professional software and require R² ≥ 0.99 to ensure quantitative accuracy. If the curve is flat or shows poor linearity, re-screen the antibody ratio and optimize the color development time.
%20and%20the%20corresponding%20standard%20curve%20(right)%20of%20the%20Human%20TGF-%CE%B21%20ELISA%20Kit_.jpg)
Fig. 2 Standard curve data (left) and the corresponding standard curve (right) of the Human TGF-β1 ELISA Kit.
Example data from Uncoated Human TGF-β1 (Transforming Growth Factor Beta 1) ELISA Kit
Cat. No.: E-UNEL-H0169
Detection Range: 0.16-10 ng/mL
R² = 0.99964
Applicable Sample Types: Serum, plasma and other biological fluids
Explore the Uncoated Human TGF-β1 ELISA Kit Used in 3 Publications →
4.2 Assay Reproducibility Evaluation
Evaluate intra-assay reproducibility (same batch of plate, same sample) and inter-assay reproducibility (different batches of plates, different operating times). Calculate the coefficient of variation (CV) of OD values, and the qualified CV value is required to be less than 10%. Excessive CV values indicate unstable operation or unoptimized reagent conditions, which need to be re-adjusted combined with checkerboard titration results.
Precision data from Elabscience® Uncoated Human IL-6 ELISA Kit:
Table 2. Intra assay and inter assay precision verification of Uncoated Human IL-6 ELISA Kit
|
|
Intra Assay Precision |
Inter Assay Precision |
||||
|
Sample |
1 |
2 |
3 |
1 |
2 |
3 |
|
Sample Type |
Serum |
Plasma |
Cell Culture Media |
Serum |
Plasma |
Cell Culture Media |
|
n |
20 |
20 |
20 |
20 |
20 |
20 |
|
Mean (pg/mL) |
12.43 |
8.44 |
62.35 |
12.88 |
8.86 |
65.87 |
|
Standard deviation |
0.275 |
0.340 |
2.226 |
0.569 |
0.665 |
2.371 |
|
CV (%) |
2.21 |
4.03 |
3.57 |
4.42 |
7.51 |
3.60 |
05 How to optimize sample dilution and evaluate matrix compatibility in Uncoated ELISA?
ELISA sample dilution and matrix compatibility are two core factors that determine the accuracy, sensitivity, and reproducibility of uncoated ELISA assays. Unlike pre-coated ELISA kits with fixed buffer systems, uncoated ELISA workflows feature flexible reaction conditions, but they are more susceptible to matrix interference and improper dilution errors. Optimizing these two steps effectively eliminates background noise, reduces false positive/negative results, and ensures consistent assay performance across different sample batches and testing runs.
5.1 Optimize Sample Dilution
Proper sample diluent
Dilute samples using the same diluent as the standards. Prefer a matched diluent, such as the Standard & Sample Diluent from the Elabscience® Ancillary Reagent Kit.
Determine the optimal dilution ratio
Perform serial dilutions (1:5, 1:10, 1:20, 1:50) on representative low/medium/high-concentration samples. The ideal dilution produces OD values falling in the 30%–70% linear range of the standard curve, ensuring the best accuracy and sensitivity. Avoid undiluted raw samples, as excess proteins and impurities cause non-specific binding and high background.
5.2 Evaluate Matrix Compatibility
Sample matrix components (proteins, lipids, metabolites) often interfere with antigen-antibody binding. Matrix compatibility evaluation is necessary to confirm whether samples fit the uncoated ELISA system.
Spike recovery test
This is the core verification method. Spike known standard analytes into blank sample matrix and pure buffer respectively for detection. The acceptable recovery rate for uncoated ELISA is 80%–120%. Lower recovery indicates matrix inhibition, while higher values mean non-specific signal amplification.
Table 3. Recovery analysis of the Uncoated Human IL-6 ELISA Kit
|
Sample Type |
Range % |
Average Recovery % |
|
Serum (n=8) |
88-101 |
93 |
|
EDTA Plasma (n=8) |
93-103 |
98 |
|
Cell Culture Media (n=8) |
92-104 |
98 |
Dilution linearity test
Test serially diluted positive samples and fit the standard curve. A correlation coefficient R² ≥ 0.99 proves good matrix compatibility and stable assay performance across different dilutions.
06 How to troubleshoot high background, weak signals, and poor standard curves in Uncoated ELISA?
Table 4. Common ELISA troubleshooting tips
|
Problem |
Causes |
Solutions |
|
Poor standard curve |
Inaccurate pipetting |
Check pipettes. |
|
Improper standard dilution |
Ensure briefly spin the vial of standard and dissolve the powder thoroughly by gentle mixing. |
|
|
Wells are not completely aspirated |
Completely aspirate wells in between steps. |
|
|
Low signal |
Insufficient incubation time |
Ensure sufficient incubation time. |
|
Incorrect assay temperature |
Use recommended incubation temperature. Bring substrate to room temperature before use. |
|
|
Inadequate reagent volumes |
Check pipettes and ensure correct preparation. |
|
|
Improper dilution |
||
|
HRP conjugate inactive or TMB failure |
Mix HRP conjugate and TMB, rapid coloring. |
|
|
Deep color but low value |
Plate reader setting is not optimal |
Verify the wavelength and filter setting on the Microplate reader. |
|
Open the Microplate Reader ahead to pre-heat. |
||
|
Large CV |
Inaccurate pipetting |
Check pipettes. |
|
High background |
Concentration of target protein is too high |
Use recommended dilution factor. |
|
Plate is insufficiently washed |
Review the manual for proper wash. If using a plate washer, check that all ports are unobstructed. |
|
|
Contaminated wash buffer |
Prepare fresh wash buffer. |
|
|
Low sensitivity |
Improper storage of the ELISA kit |
All the reagents should be stored according to the instructions. |
|
Stop solution is not added |
Stop solution should be added to each well before measurement. |
07 Which Uncoated ELISA products and tools support assay development?
Option 1: Use pre‑validated ancillary reagent products (Recommended)
Purchase Elabscience® Ancillary Reagent Kit (Cat No. E-ELIR-K001). It contains fully validated coating buffer, blocking buffer, sample diluent, wash buffer, TMB substrate and stop solution. All buffers have been system‑verified with Elabscience® uncoated ELISA portfolio, minimizing risks from self‑prepared buffer errors. Simply follow the SOP for consistent results.
Option 2: Self‑prepare buffers (when ancillary reagent kit is not purchased)
Refer to the following formula to prepare each universal reagent.
(Note: The following formula only contains the basic component information of each reagent, which can be optimized according to the experimental requirements and results)
Table 5. Main components and preparation methods of ancillary reagents
|
Component |
Main Component and Preparation method |
|
PBS(1×) |
3.58 g Na2HPO4・12H2O, 0.21 g NaH2PO4・2H2O, 8 g NaCl, 0.2 g KCl, Make up to 1 L with pure water, pH 7.2-7.4 |
|
Coating Buffer |
1.59 g Na₂CO₃, 2.94 g NaHCO₃, Make up to 1 L with pure water, pH 9.2-9.6 |
|
Blocking Buffer |
1× PBS, 0.01% PC300, 0.01% Tween® 20, 1% BSA, pH 7.0-7.4, 0.2 μm filtered |
|
HRP conjugate Diluent |
1× PBS, 0.01% PC300, 0.01% Tween® 20, 1% BSA, pH 7.0-7.4, 0.2 μm filtered |
|
Antibody Diluent |
1× PBS, 0.01% PC300, 0.01% Tween® 20, 1% BSA, pH 7.0-7.4, 0.2 μm filtered |
|
Standard & Sample Diluent |
1× PBS, 0.01% PC300, 0.01% Tween® 20, 1% BSA, pH 7.0-7.4, 0.2 μm filtered |
|
Wash Buffer |
0.05% Tween® 20 in PBS, pH 7.2-7.4 |
|
Stop Solution |
5% sulfuric acid |
Stable and reproducible uncoated ELISA assay development relies on standardized uncoated elisa workflow, scientific elisa antibody pairs screening, optimized reaction conditions, and high-quality supporting reagents. By following the step-by-step optimization guide in this article, researchers can effectively solve common problems such as high background, weak signal, and poor standard curve linearity, and quickly build a mature custom ELISA detection system.
Whether you are developing a new biomarker assay or optimizing existing experimental conditions, Elabscience® professional uncoated elisa kit and technical services can provide full support for your experiments.
08 Related resources
● Gain a step-by-step visual walkthrough of the complete uncoated ELISA workflow, from coating and blocking to detection and reading.
Watch Uncoated ELISA Kit Operation Guide →
● Learn how to match kit format, sample type, sensitivity, and target requirements before starting your uncoated ELISA assay.
Read How Do I Choose the Right Uncoated ELISA Kit for My Experiment? →
● Master the processing of common and special sample types, including key handling notes and practical tips to reduce matrix interference and improve ELISA sample dilution accuracy.

